
 DATAform Add-on "Hello World" DATAformXTension for QuarkXPress DATAformPlugin for InDesign |
|
| The shortest way to see DATAform Add-on live. We will pass over an ASCII command line and the XTension will create a text box containing "Hello world". 1) Load and install DATAform Add-on 2) Start and prepare your layout program
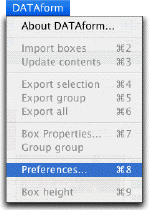
Choose the "Preferences..." command . Then click the "Clipboard" radio button in the left column :
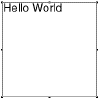
Close the dialog with OK. ¶*T3*$Hello World¶ - Switch to your QuarkXPress or InDesign, A text box with the words "Hello World" will appear: If no text box is created: draw a text box manually, paste the copied text into it, select the text in the box and copy it from there - this means from within your layout program. - Choose the "Import boxes" comand in the DATAform menu again.
To see some more features copy this line: ¶*T3*x100*X400,123*y200*Y300*B"cyan"*b0.3*l0*-0*p8*$Hello World on page 8¶ - Switch to your QuarkXPress or InDesign again A new text box will be created on page 8 - the tag *p8 means "page 8". Missing pages will be automatically created.
The last example here will create two boxes and a line, showing different box properties and font styles: ¶*T3*p1*x85.866*y97.677*X216.087*Y170.079*F2*L128*l1*M"Green"*B"Black"*-0*b0.1* Copy the above text and import it into QuarkXPress or InDesign by the "Import boxes" command. Three items created by one DATAformTags text. The text in your boxes may differ from the above picture: your browser may add spaces on copying. This example uses the current default font of QuarkXPress or InDesign . To figure out how to explicitly set fonts or
Try another step-by-step demonstration, the DATAformXTension/Plugin demo. In the DATAformXTension developer handbook you may find many detailed examples. |
|


DATAform in der Presse
DATAform-tour
Dokumentation
XTension für QuarkXPress
Plugin für InDesign
Dokumentation
Preise, bestellen
XTension for QuarkXPress
Plugin for InDesign
Documentation
Prices, Orderform
Send an email